Joachim Köppen Kiel/Strasbourg/Illkirch Spring 2007
In the bottom of your cardboard box (from muesli or
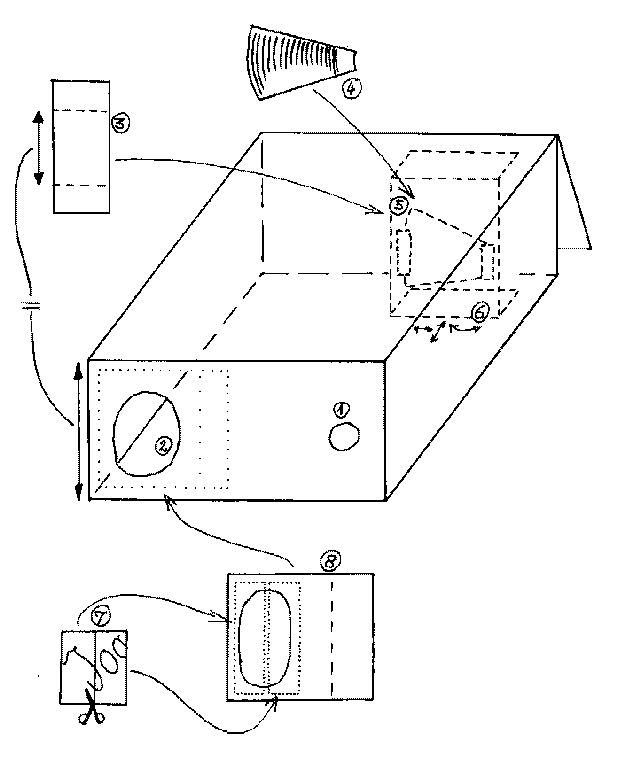
cereals) cut a small hole which will serve as the viewing
opening
make a larger hole for the entrance aperture. Both the sizes
and the separation of these holes are not critical.
Take a strip of cardboard to make the holder for the CD ROM
piece: Its height should snugly fit the interior of the muesli
box, and it should be broader than the CD ROM piece, that
is, it should be larger than one half diameter of a CD ROM.
The flaps at the top and bottom are for glueing it to the
box, and can be any dimension you prefer.
Cut the CD ROM: Take a good pair of scissors, hold
the CD firmly, and simply cut it from the outer rim
to the centre in one go with even pressure.
The silvery foil of the CD is the most important part,
as it contains the grooves. It often comes off at the
cut edges. It is a good idea to pass a hot soldering iron or a
plastic cutting tool over the "top" side in order to fix the
silvery foil by melting it to the plastic body.
An even better way is to use a soldering iron or a hot-wire plastic
cutter to cut the CD.
Do not glue the CD ROM with its "top" side
(which contains the lettering etc) directly to the cardboard
holder. Instead, attach strips of sticky tape to the
clear "bottom" side (into which you would look) and fix the
tape strips to the cardboard.
Placing and positioning the CD ROM in the box is the most delicate
part of the construction. After some initial trials to get a rough idea
at which position and which orientation you best see the
spectrum of a test light source (a small penlight held to the
entrance opening helps!), apply glue to the top and bottom flaps
of the holder, and fix it in the box at the desired position.
While the glue is still not dry, you can then adjust its orientation
until you get the best view. If your room has fluorescent lights,
they serve well because of their distinct spectrum of bright
emission lines!
The slit is made from a suitably sized piece of the silver plastic
cover of yoghurt containers (or white cheese ...). With a good
pair of scissors, make a straight, clean cut across the middle.
The two pieces then are placed side by side ...
... on a flap cut from cardboard which will cover the spectroscope's
entrance hole. A narrow gap (half a mm or less) is left between
the two yoghurt strips.
The orientation also determines the order of the spectrum.
So you might want to build one instrument working at second order,
but also one for first order which is better for the fainter sources...
For simplicity one can also use for the slit a piece of cardboard
which one had cut in half by a clean straight cut ...
The reason to place the slit on a flap is that it is convenient
to observe small bright street lamps directly, rather than trying
to aim for them through the narrow slit!
In a similar way as the flap carrying the slit, one may also add
a flap with the diffusor
made from a clear plastic bag
Just in case: if it did happen that you had glued the CD directly on
the cardboard holder, and then the silvery surface came off,
don't dispair, and don't throw away the 'damaged' CD piece!
Look through it at a light source ... you'll see two spectra left and
right (or above and below) the light source. You've created a
transmission grating which could
be just as useful!