PlanetTraveller
Joachim Köppen Kiel/Strasbourg/Illkirch November 2010
Contents
The PlanetTraveller Applet computes and displays the orbit of a body around the Sun. This can be a planet, an asteroid, a comet, a chunk of rock that may collide with the Earth, or a spacecraft sent off from Earth into interplanetary space. The orbit is treated as a simple Keplerian orbit around the Sun, thus we neglect the perturbations by all the other bodies in the Solar system. We also neglect any inclination of the orbit against the plane of the Earth orbit. This is sufficient for getting a first idea. And as long as we are not interested in the positions after many orbits or the exact close approach to the target planet, this is a fair approximation.
The applet comes in several versions, which offer features convenient for various problems. They are
In these pages, the various features of the applets are described. As we shall use the version which has all features, you will find that some may not be present in the version you are working with.
When you start up the applet, you would see something like the following screen:
On the left hand side there is a number of fields to enter the position and velocity data of the target body at time 0.0; below are shown the properties of the orbit. The right hand side gives a view of the Solar System as seen from a point above the Ecliptic plane, showing the orbits of the planets: Here we selected the major planets only, and we had already clicked drag & zoom and dragged a small rectangle to concentrate on the inner part. The Earth and all the planets move around the Sun in counter-clockwise sense. The target body's orbit is shown in red, the green dot marks its position at time 0.0 - which means here the time of the collision with Earth (whose orbit is blue). The thicker parts of the red curve indicate the positions at which the body is seen from the Earth with both brightness and proper motion sufficiently large to be detected (for these detection limits see below). The grey orbit is that of the "manual interceptor": here it had been designed to intercept with the target body at the small red circle (see below).
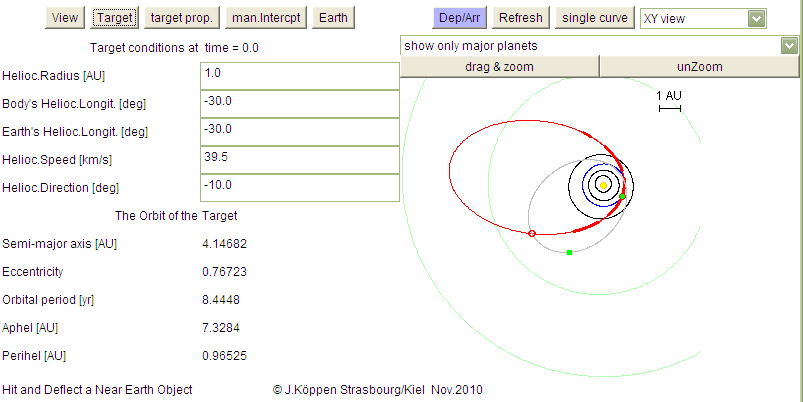
On the top there are several buttons to perform the navigation between the various pages of the Applet. Please note that these buttons differ in the various versions. Right now, we are on the Target Orbit page, which lists the relevant parameters:
For more realistic simulations, you may want to use proper orbits for the planets: you may consult the Orrery applet or any similar program to get the Heliocentric Longitudes and Distance from the Sun of the body and the Earth at a certain reference time and then adjust the speed and direction to match the orbit.
The characteristics of the orbit are displayed as
On the right hand side we saw the plot of the orbits in the Ecliptical Plane. But there are other plots:
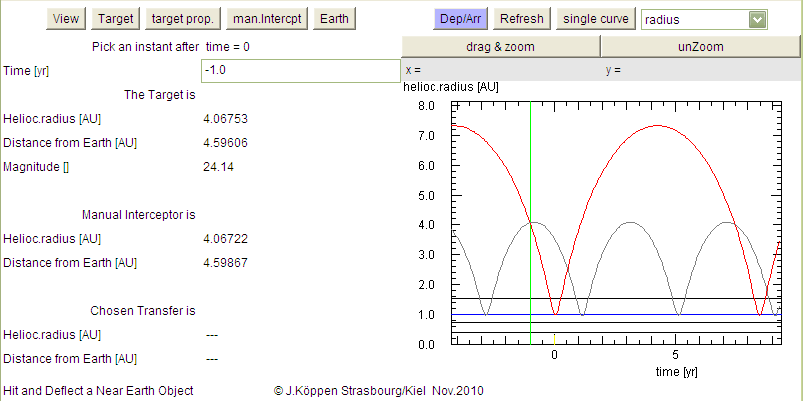
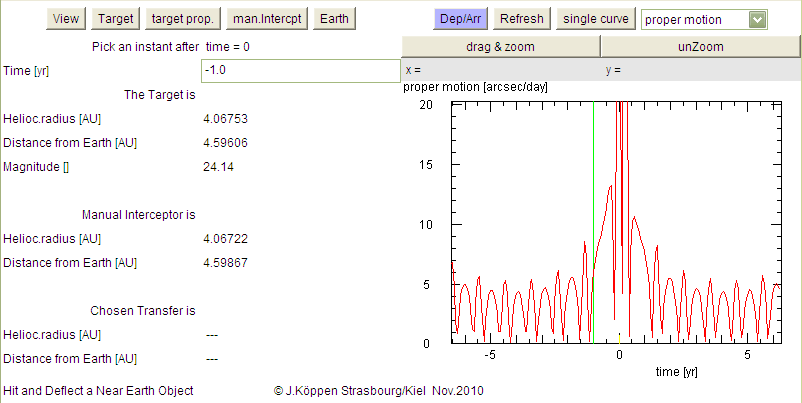
Radius displays the distance of the target body from the Sun
as a function of time by a red curve. The horizontal lines indicate the
major planets. We see that this body passes the Earth orbit every
8.4 years, and that at the instant marked with a green line
(time = -1.0, i.e. one year before the collision) the body was 4 AU
from the Sun and 4.6 AU from the Earth, as seen on
the View page on the left hand side.
Note that here we enter the time for the green mark, and that this
instant is marked in the plane plot with the small red circle. For this
instant, data on the bodies' distances are displayed, as well as if the
body is hidden behind the Sun or passes in front of it. The grey
curve is the distance of our interceptor, where we can identify the
launch from Earth and the meeting with the target.
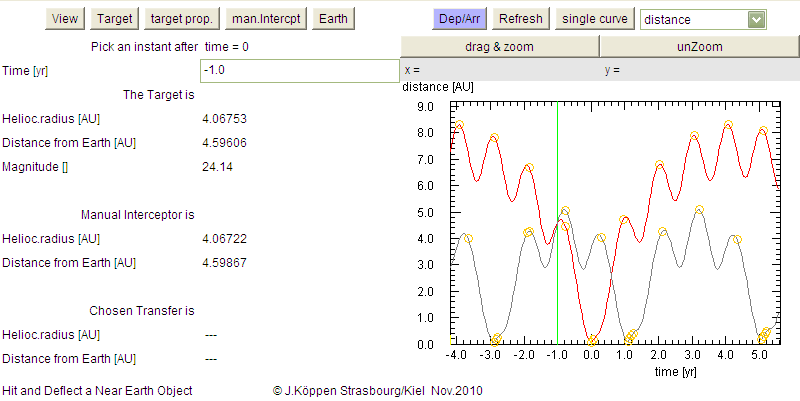
Next we can plot the Distance from Earth as a function of time.
We see the yearly oscillation because of the Earth movement. Again,
the grey curve shows the progress of our interceptor.
A further aspect is indicated by the orange circles on the curves: they
mark when the interceptor (or the target) in either behind the Sun
or passing right in front of it, which could cause a communications
blackout! Please note that these marks are rather cautious: They
appear when the Sun and body are closer than 15 degrees. But also
keep in mind that the marks can be drawn only if the scale of the time
axis is not too coarse.
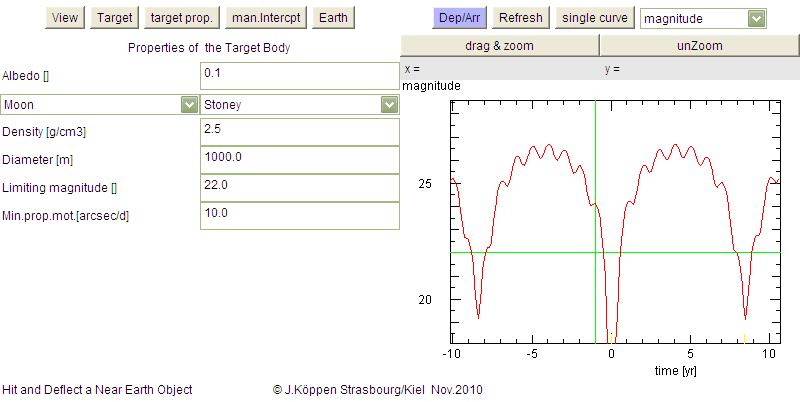
As a result of the varying distance the brightness Magnitude
of the body as seen from Earth changes. Evidently it becomes very
bright prior to its collision. [Please note that in the Jupiter version,
this magnitude is NOT computed]
In the computation of the brightness we take into account the size of
the body, but also under what angle we look at it: when the body passes
by between Sun and Earth, we observe only part of its lit surface.
On the left hand side, we now have the
Target Properties page: it contains input and
output fields related to the properties of the body and to its
detection:
The Radial Velocity is shown. Red curves indicate the body
moving away from us (redshift), blue curves that it moves towards us.
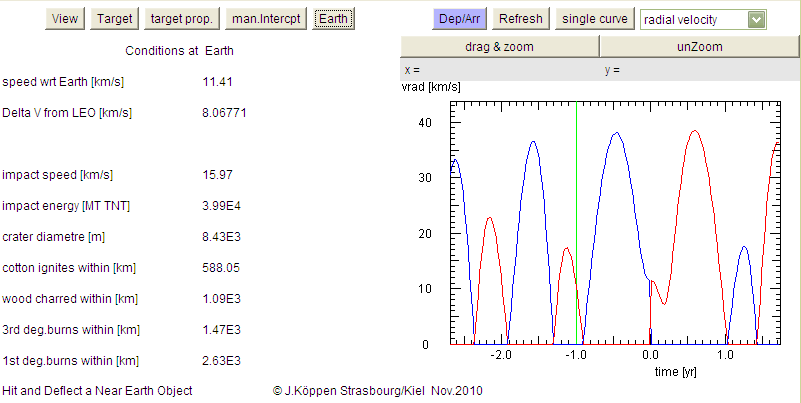
On the left hand side, we went to the
Earth page: . It tells about the conditions
at collision time (such as: the speed with respect to Earth
(this takes into account the orbital speed of the Earth),
the velocity change that would be necessary to either place
the incoming body into a low Earth orbit, or to insert a space
probe from its parking orbit into the red trajectory.
Furthermore, it gives the speed of the impact (which takes into
account the gravitational attraction of the Earth), and the resultant
impact energy (in Megatons of TNT). We also list estimates for the
resulting crater size and measures of the devastation from the impact.
The formulae are taken from the
JavaScript utility by A.Goddard based on formulae
by Eugene Shoemaker.
Finally, we also show the Proper Motion which is the
apparent movement of the body seen in the sky from Earth. This
motion is larger than that of the stars and it thus serves as an
indicator of a close-by object, and is useful for the detection of
these bodies.
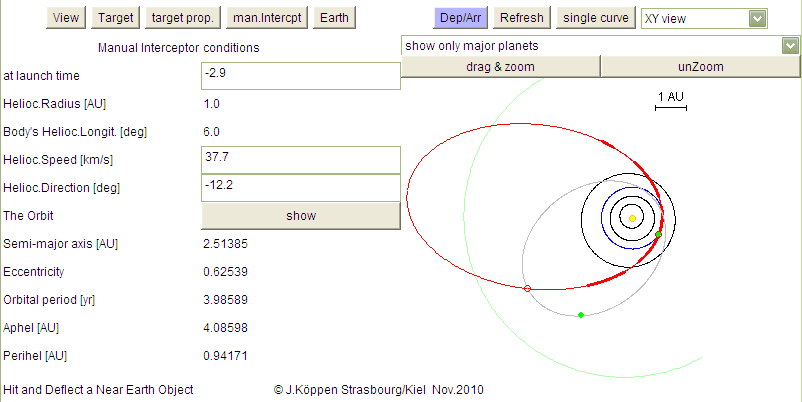
The Manual Interceptor
allows to launch a space probe, for instance to meet the target
body at some position or some time before its collision with
Earth.
The page on the left has these input fields
If you want the spacecraft to meet the target at a certain time,
enter this time on the View page so that the positions
of the target and the interceptor are marked with the small red
circles. All you need to do is then to fiddle with the insertion
parameters until the two circles meet.
In the example shown, the probe was launched at t=-2.9 from
Earth - the spot is NOT specifially marked. The green dot marks
when it would be at time=0 (collision time). It meets the target
at t=-1, marked by red circle.
There are two more buttons in the upper right: Refresh
simply redraws the plot, in case of need. single curve/over
allows to overplot several curves, for instance if one wants
to compare the curves from two different orbits for the target body or
for the manual interceptor ...
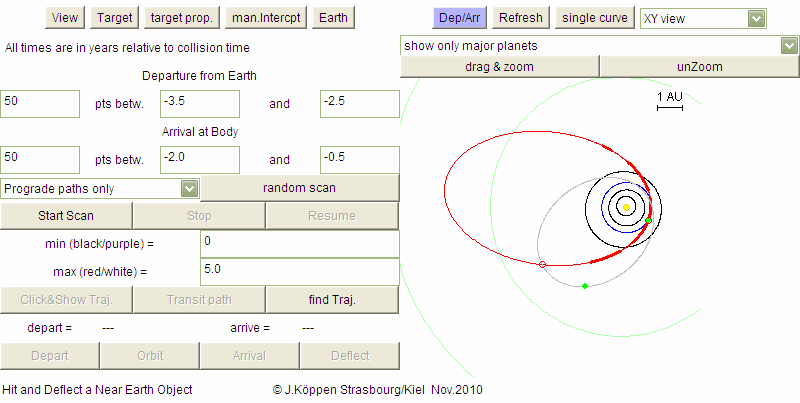
The Depart/Arrive page:
Two versions have the blue button which gives access to the page
on the left:
This rather complex page is used in a number of ways to find the
trajectory of a voyage from the Earth to the target body at some
times of departure and arrival:
Let us describe each option in detail:
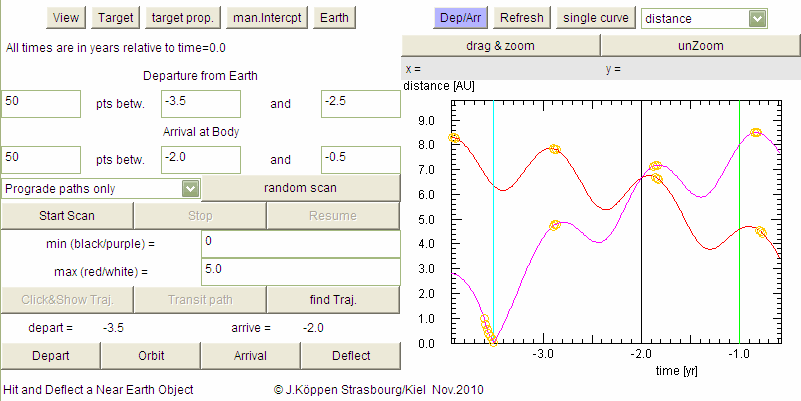
For searching the orbit for
fixed departure/arrival times
we first enter "0" in the left-most fields, the departure and arrival times
in the central fields, and then click the button find Traj..
If a trajectory could be found, the input field now are marked green, the
times are also displayed at lower left, and
at the tight hand side, the trajectory for this voyage is shown as a magenta
curve. The departure is marked with a cyan dot, the arrival with a black
dot.
If you want to see the entire orbit, click on Transit path/Full orbit:
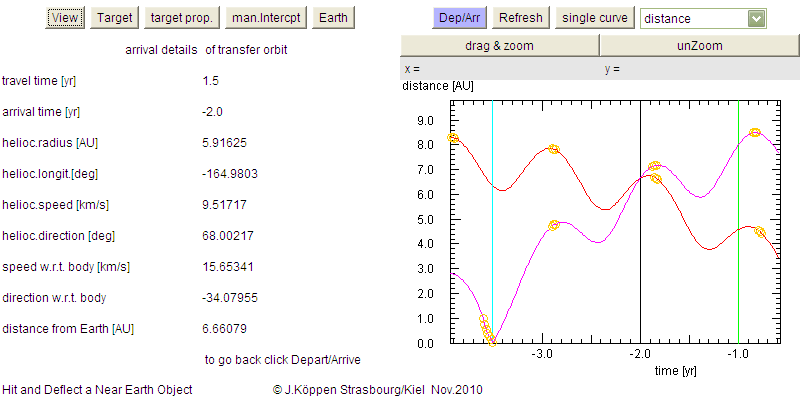
Having found a trajectory, you can also inspect the details of the mission
by using one of the plot. For instance, how the distance varies with time:
Vertical lines mark the departure (cyan), arrival (black), and our time
mark (green). A grey curve would be shown for the manual interceptor,
but to avoid cluttering up this plot, we had clicked the hide
button. The magenta curve shows that during this voyage the
distance varies, because of the spacecraft moving away from the Earth,
but also due to the Earth orbiting the Sun. This would be of importance
to know, if we have to schedule the communications link to the craft.
From this plot you realize that this particular mission would
have the disadvantage that shortly after arrival, we would be out of
touch with the spacecraft!
Furthermore, the buttons at lower left Depart, Orbit,
Arrival, Deflect give access to pages with the
numerical values, for instance the situation at arrival:
Click the blue button Dep/Arr to regain access to all other
pages.
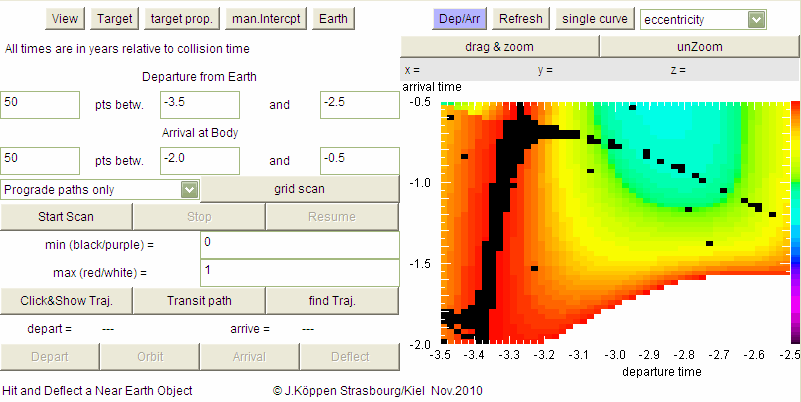
We can systematically search for suitable voyages
in a range of times by entering
Here, the white regions are hyperbolic orbits, red are highly elliptic ones,
and the light blue area comprises trajectories between Earth and the
target which have minimum eccentricity, i.e. close to Hohmann type
ellipses. Some remaining black squares indicate departure/arrival times
where the search routine did not find the solution; a finer search would
reduce their number but would also be more time-consuming. In the
applet, some compromise was taken.
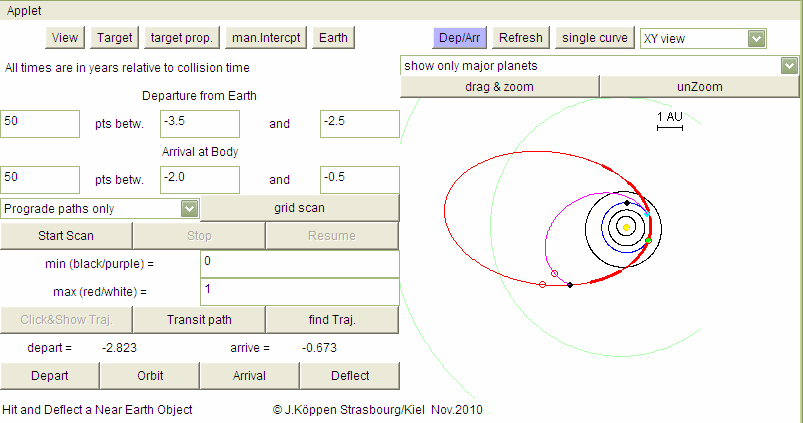
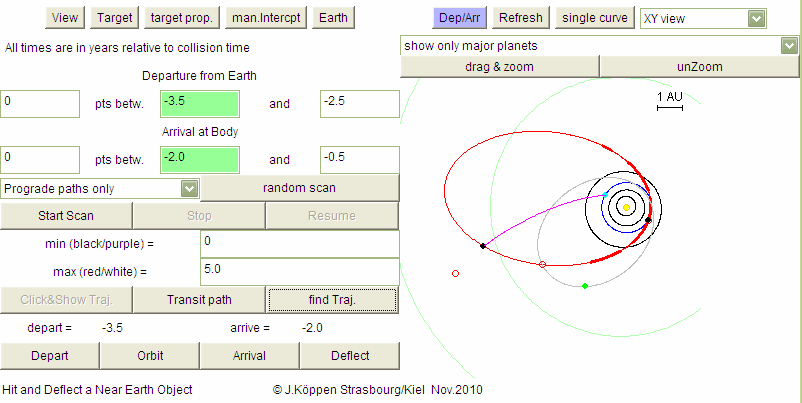
To pick a certain voyage we first
click on the button Click&Show Traj. and then click on the
map at the point we are interested in. The plot of the ecliptical plane
is shown with the orbit of this particular voyage:
The cyan and black dots indicate the positions of Earth and the target
at departure and arrival times. Note that in this screenshot the
red circles (which mark the time= -1) show that for this mission the
target and the spacecraft will not be in the same place ... as shown
at lower left, arrival time is -0.673, a few months later!
The details of the voyage will be accessible from the buttons at
lower left Depart, Orbit, Arrival,
and Deflect (for the NEO version).
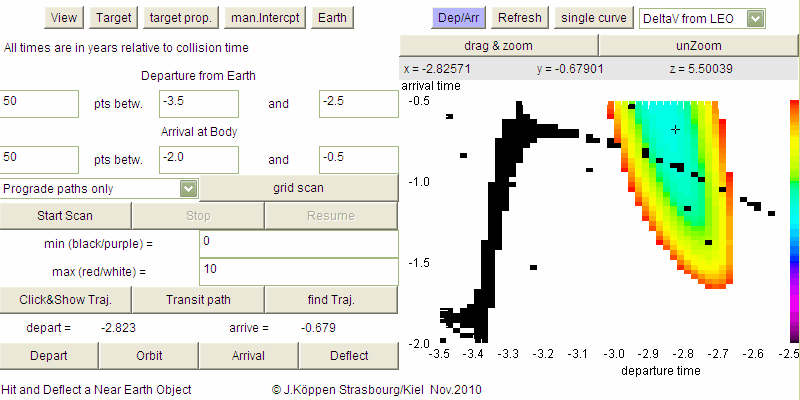
Once we have done a complete (or even partial)
scan of the times, we can now show the characteristics of these
orbits, for example the velocity change necessary to
launch this spacecraft from low earth orbit (LEO):
As can be seen, the mission we had picked - marked with a small black
cross - is quite close to the minimum value for this velocity!
If you click on the map, the coordinates X,Y,Z will be displayed,
that is: departure and arrival times and the value of the map
found for these particular times. Here, we read that the velocity change
from LEO is only 5.5 km/s. Any clicked point is marked by a
single white pixel.
Finally, we may zoom in the map
but only to prepare the next scan!
Click on drag & zoom and then drag
the mouse over the rectangular area which you like to explore in more
detail. The chosen rectangle is painted in the map, and the new ranges
for departure and arrival time appear in the appropriate fields.
If you are not satisfied with that, a click on unZoom brings back
the initial ranges, and you may try again (I choose not to go to the trouble
to remove the selected rectangle!) Only when you click on
Start Scan the new map will be displayed, but please note
that now the previous range values are no longer present. If you want
to go back to the old map, you have to enter the range values yourself
and make another scan.
Here is a list of all the graphical displays available:
| Top of the Page
| Applet Index
| my Web Page
|
last update: 10 Nov. 2010 J.Köppen
Here you also find a button to show/hide the interceptor's
orbit in the plot.
At lower left, the characteristics of the resulting orbit are listed.
After a bit of practise, you'll find it quite easy to adjust the
parameters so that you get the desired orbit!

If we wait until the scan is finshed, we get a complete overview of the
possible trajectories: