How to observe with your RadioJove receiver
Joachim Köppen DF3GJ Kiel/Strasbourg/Illkirch Summer 2004
Whatever you do at the observatory, whatever you notice with the
equipment, whatever you find extraordinary about the environment,
always leave a precise and careful record in the observatory's logbook!
When you start the observing run with your receiver:
- in the menu Options, submenu Identity enter your
name in the Field Observer Name, then click Save
and Done
- connect your receiver to the 12 V power supply, its antenna
terminal to the cable from the filter and/or calibrator, and
the audio cable to the computer. If you have a loudspeaker with
amplifier, connect its input to the second audio output of the receiver
- switch on the receiver. You should hear a hissing noise in the
loudspeaker. When you connect the antenna to the antenna
socket of the calibrator - and the switch is in 'antenna' position -
you should hear an increase of noise.
- if you hear any tones, whistles, melodic or rythmic sounds, man-made
signals, tune a bit away, until you hear a simple hissing or rushing sound.
- make sure that the calibrator is connected to the power supply,
that it is at maximum level (0 dB attenuation), and that the
switch is set away from "antenna" to "calibrate". You may have
noticed that the hissing noise increases when you apply power to the
calibrator and when you set the attenuator to 0 dB position
- click on the "Start" button of the SkyPipe software window
- adjust the volume control of the receiver to get a trace at about
1000 to 2000 units of the y-axis.
(the exact level is unimportant. But don't make it too large (e.g. 20000)
because the sound card cannot handle signals stronger than
about 30000, and you want to be sure to be able to record also
strong solar bursts without driving the sound card into saturation...)
- now commence the calibration sequence: make a trace for about 30
seconds of each attenuation step from 0 dB to -25 dB (full attenuation).
It is useful to make a note in the logbook of the amplitude value of
each calibration step...
- after that last step, remove the power lead from the calibrator, and
make another 30 sec recording.
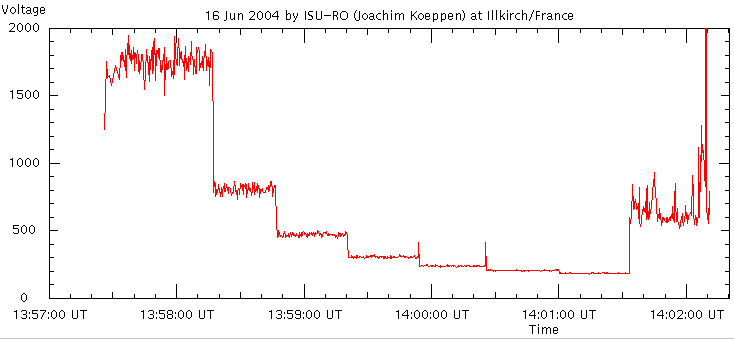
This is the level of the internal
noise of the receiver. You should get something like this: after the six
calibration steps, the lowest step is the receiver noise - after which
comes the signals from the antenna at about 600 units.

You should see a clear drop of the level (e.g. in Strasbourg the level
changes from 200 to 180 when I remove the calibrator power), because
the internal noise of the front-end of the receiver corresponds to
about +6 dB over thermal noise (i.e. a factor 4), but the last step
of the calibrator gives a noise of +10 dB (factor 10). If you don't
see this clear change, there's something wrong!
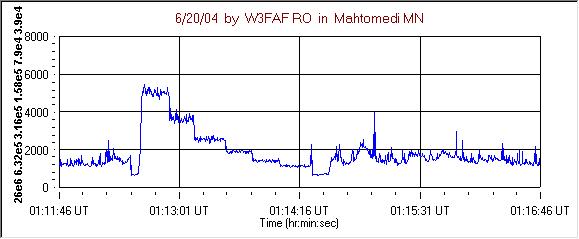
Below is a calibration sequence (in 3 dB steps) from W3FAF who
prefers to record the receiver's noise also just before the sequence:

- after that, switch from calibrator to "antenna". Now the receiver
is connected to the antenna, and the observations start.
- Do not change the receiver's volume control after this
calibration sequence , because it will change the calibration!!!
- it is useful to keep also a note in the logbook about the mean or
the lowest level of this external noise, as well as any remarks of
how the signal sounds like, for instance whether you hear the
typical crashing sounds of distant lightnings...
- Use the calibration steps to make a rough estimate of the
external noise level: Because of the background emission
by the Milky Way, one expects a minimum noise of about 50 kK
(= +22.4 dB over thermal). This will occur only during the night,
and only if there is no interference. The level of the external
noise tells us how noisy our site is, thus limiting the sensitivity
of our 'radiotelescope'. In Strasbourg, we have usually
around 100 kK background during the day - but sometimes
higher because of the computers in the building -
and on a few interference-free nights it was as low as 50 kK.
- at this time, it is practical to return the calibrator's attenuator to
the 0 dB position, as well as to restore power to the calibrator.
In this way, you are prepared for the next calibration squence.
Also, it is good to keep the calibrator powered all the time, so
it can stabilize itself and give a constant noise level.
During an observation run:
- it is a good idea to listen - using the additional amplifier-loudspeaker.
But do not touch the receiver's volume control
- if you hear some man-made signals, tune the receiver a bit away
to a clear spot with only hissing noise.
- you might find the chart filled with strong signals, and if you
find by listening that they are artificial - such as the melodious sounds
of a radio teletype transmission - tune away. But please make a note in
the logbook, so that later you know that that strong signal was found
to sound like ..... and judged man-made!
- you may alter the horizontal and vertical zoom of the SkyPipe
screen ...
- train your eyes to identify which sound makes which kind of
recording. The brief impulses or whistling sounds you'll find
will make only a sharp spike. Lightning crashes make a bit longer
pulses. Any radio communications (voice or data) often shows
up as very strong signals lasting some time and showing quite
some structure... All this is rather different from a solar burst,
as you can see in the examples from the RadioJove archives
at NASA's GSFC.
- you can make a calibration sequence...
At the end of your observing run
- make a calibration squence to compare with the one at
the start of the run!
- then press the "stop" button
- then the program will ask you whether you want to save the
data. Say "yes". You do not need to enter a file name!
- then you may disconnect your receiver, and hand over
to the next observer.
- record all your actions in the observatory's logbook!
| Top of the Page
| back to Main Page
| back to my Home Page
|

