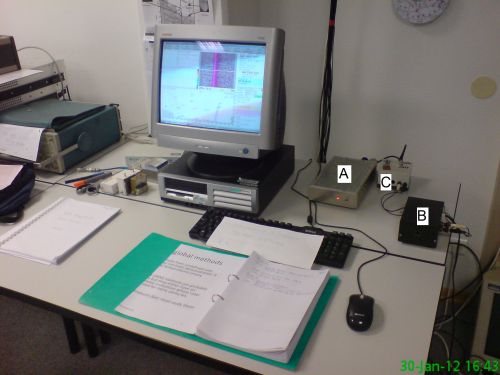
- switch on the computer and enter the password
- switch on the controller interface (the flat silvery box (A) next to the computer)
- switch on the small black box (B)
- switch on the small white plastic box (C) next to the controller (important: this switch is the circuit breaker for the telescope receiver, and should always be last to be switched-on and first to be switched-off
- start the telescope software (JKSRT3)
- the telescope will always perform an automatic maneuver
to Stow. If the telescope had been left at stow position,
this will take only a few seconds. In any other case, it will
take some time. During this maneuver, the AzEl field will
blink red or blue, as an indicator of activity and that it is
moving in azimuth and elevation, respectively.
This maneuver is absolutely necessary for the calibration of the positioning system. Just wait ...
- it is a good idea to first stay at the stow position for a while, and monitor the spectrum (in case it shows some strong and sharp features, which are clearly interference) and simply inspect the power: if you get values as low as 50 cts, you may be sure that interference could make observations impossible ...
- perform your manual observations
- put your batch file in the folder C:/SRTcassi/ and start your batch observations
- whatever you do, don't forget to keep the Observatory log
- move the telescope to Stow or Park position. The stow position is best if one wants to use the telescope very soon again (next day), but the park position is better for putting the telescope to rest for a longer period.
- Exit the software
- switch off the small white plastic box (C) next to the controller (let this be always your first action)
- switch off the controller interface (A) and the small black box (B)
- take your data (in the folder C:/SRTcassi/)
- shut down the computer and switch off the monitor
| Top of the Page | Back to the MainPage | to my HomePage |
last update: Feb. 2010 J.Köppen